Overview
 Welcome to the Parrot S.L.A.M.dunk documentation!
This site describes how to develop for the Parrot S.L.A.M.dunk.
For developement questions, where Parrot S.L.A.M.dunk software engineers and users can answer, use the developer forum:
For other inquiries, such as hardware related issues, please favor the support website:
Getting started
The Parrot S.L.A.M.dunk is powered by the following technologies:
- Ubuntu Trusty (14.04)
- ROS Indigo
To interact with it, you need a ROS Indigo compatible platform. We recommend using Ubuntu 14.04, which is the platform of reference the product has been tested against. Refer to the ROS wiki for installation instructions:
It is also possible to develop on the Parrot S.L.A.M.dunk directly, this may be convenient to get started quickly.
Once the ROS tools are installed, it’s possible to test the communication with the Parrot S.L.A.M.dunk node.
First step is to make sure the ROS environment is configured:
source /opt/ros/indigo/setup.bash
Then you need to export the ROS_MASTER_URI to point to the ROS master.
A roscore node is running on the Parrot S.L.A.M.dunk,
this is documented in the ROS Integration: roscore section.
When connected to the Parrot S.L.A.M.dunk on the Micro-USB 2.0 OTG port,
the ROS_MASTER_URI environement variable can be set to:
export ROS_MASTER_URI=http://192.168.45.1:11311
You also need to export ROS_HOSTNAME.
This should be a name the Parrot S.L.A.M.dunk can contact.
If Bonjour/Zeroconf is supported, a possible value is:
export ROS_HOSTNAME=$(hostname).local
Now, to verify the setup is working,
we can list the nodes.
If everything is setup properly,
/slamdunk_node should appear in the output.
$ rosnode list
/rosout
/slamdunk_node
And the product’s firmware version should be printed when typing:
$ rosparam get /properties/ro_parrot_build_version
1.0.0
To list all the available topics:
$ rostopic list
...
Visualization with rviz
The Parrot S.L.A.M.dunk publish many topics. The topics vary greatly from IMU to 3D point clouds, passing by depthmap and SLAM pose.
rviz is a very useful tool to visualize all these data.
The Parrot S.L.A.M.dunk comes with a preset display configuration for rviz. The configuration shows a few topics and does not require additional rviz plugins.
To retrieve the configuration and run it, type (default password is slamdunk):
scp slamdunk@192.168.45.1:slamdunk_qsg.rviz .
rviz -d slamdunk_qsg.rviz
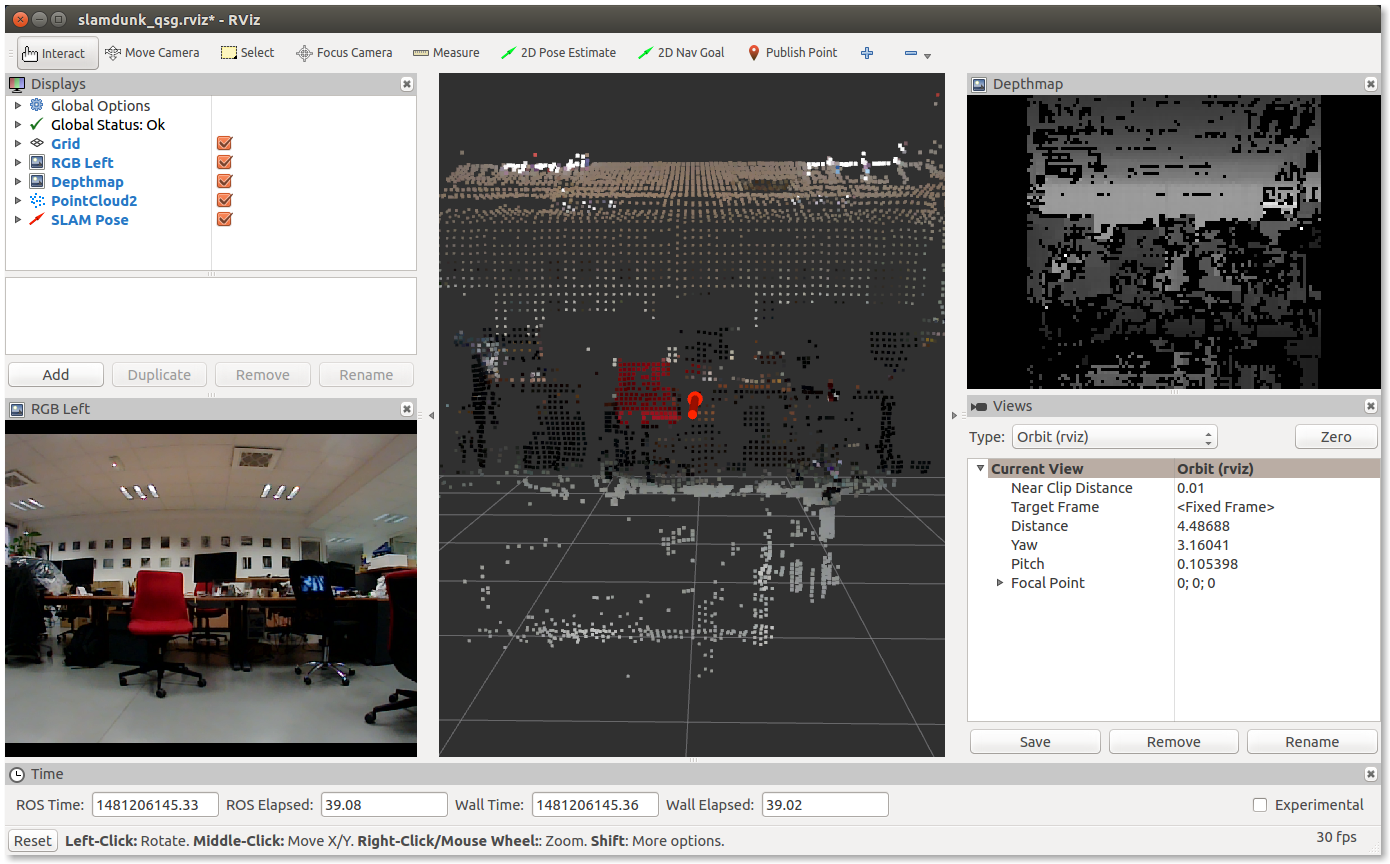
The slamdunk_visualization package
In the slamdunk_ros Github repository,
a more advanced rviz configuration is available.
This configuration is part of the slamdunk_visualization package.
To test the advanced rviz configuration, first follow the build steps described in the slamdunk_ros packages section.
Then, if you are not on the Parrot S.L.A.M.dunk itself, configure the environment (cf. Network setup):
export ROS_MASTER_URI="http://192.168.45.1:11311"
export ROS_HOSTNAME=$(hostname).local
Finally, launch rviz:
rviz -d $(rospack find slamdunk_visualization)/rviz/slamdunk.rviz
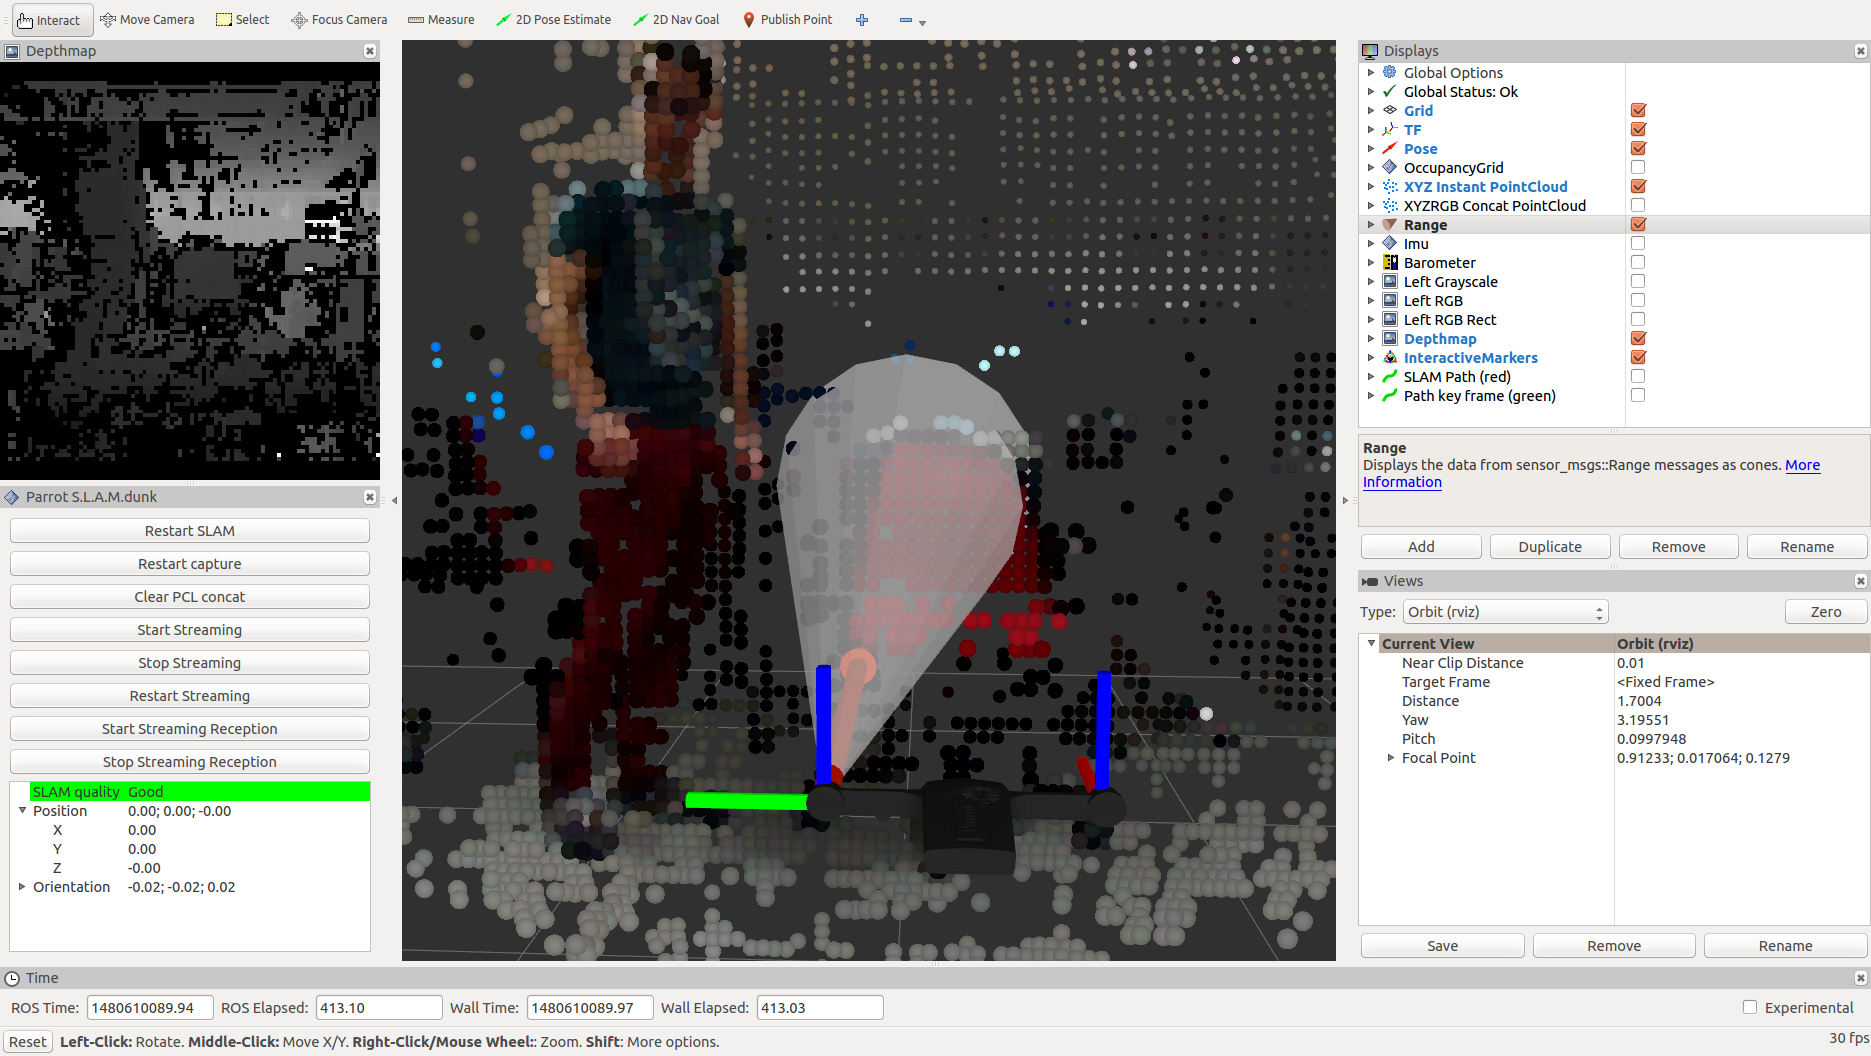
The slamdunk_ros packages
Why build the slamdunk_ros packages?
For first-time users of ROS, building the packages is a good way to get a first hands-on experience on using the ROS tools for building and running nodes.
These tools includes, but are not limited to, catkin and rosrun.
The slamdunk_ros packages offer a few useful things apart from the S.L.A.M.dunk node itself:
- slamdunk_visualization: rqt and rviz configuration, rviz plugin to display Parrot S.L.A.M.dunk-specific data
- slamdunk_msgs: custom messages
- slamdunk_nodelets: some nodelets that can also be run outside of the Parrot S.L.A.M.dunk
- and a few other packages to work with the Bebop Drone
System prerequisites
sudo apt-get update
sudo apt-get install build-essential git
Prepare catkin workspace
In this step we create a new empty catkin workspace.
source /opt/ros/indigo/setup.bash
mkdir -p ~/slamdunk_catkin_ws/src
cd ~/slamdunk_catkin_ws/src
catkin_init_workspace
cd ~/slamdunk_catkin_ws/
catkin_make -j2
Once the workspace is configured, you can activate the environment by typing:
source devel/setup.bash
Get the source
The source code of the node is available on Github:
To download the sources, type:
git clone https://github.com/Parrot-Developers/slamdunk_ros.git src/slamdunk_ros
git clone https://github.com/Parrot-Developers/gscam.git src/gscam
Disable slamdunk_node unless you build on Parrot S.L.A.M.dunk
The slamdunk_node and slamdunk_bebop_robot depends on kalamos-context,
which is a S.L.A.M.dunk-specific library.
To build the slamdunk_ros package outside of the Parrot S.L.A.M.dunk,
they need to be disabled.
touch src/slamdunk_ros/slamdunk_node/CATKIN_IGNORE
touch src/slamdunk_ros/slamdunk_bebop_robot/CATKIN_IGNORE
Install dependencies
sudo rosdep init
rosdep update
rosdep install --from-paths src --ignore-src
Build the node
To actually build the code, type:
catkin_make -j2
What to do next?
Writing a C++ subscriber node to Parrot S.L.A.M.dunk
This tutorial explains how to make a C++ ROS node that subscribes to the Parrot S.L.A.M.dunk topics.
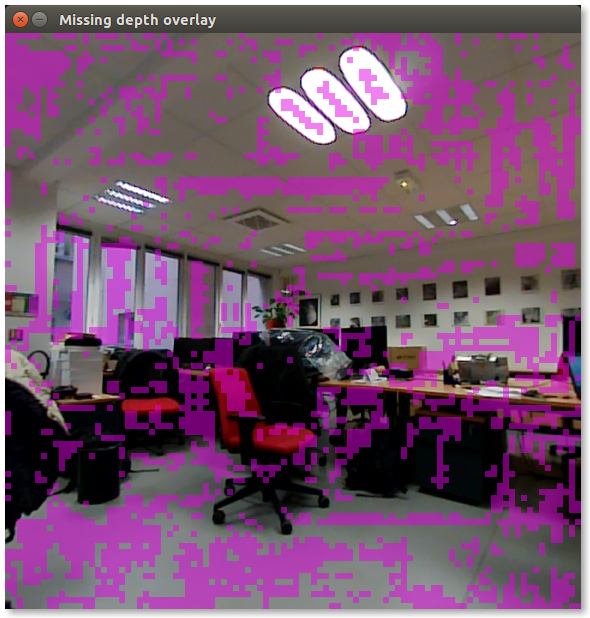
This node will subscribe to two topics, the left camera rectified color images and the depth images. A callback function takes this pair of images and highlights the part of the color images that do not have depth information.
This demonstrates how to subscribe to multiple inputs at once to feed an algorithm.
The node can be developed either on one’s personal computer, or on the Parrot S.L.A.M.dunk itself. The only requirements is to have the ROS Indigo development tools installed.
Prerequisites
sudo apt-get update
sudo apt-get install build-essential git
Create catkin workspace
source /opt/ros/indigo/setup.bash
mkdir -p ~/slamdunk_tutorial_ws/src
cd ~/slamdunk_tutorial_ws/src
catkin_init_workspace
cd ..
catkin_make
See also:
Create a new ros package
cd src
catkin_create_pkg slamdunk_tutorial cv_bridge image_transport message_filters roscpp std_msgs
cd ..
catkin_make
source devel/setup.bash
See also:
Write the node
Go to the package’s directory:
cd src/slamdunk_tutorial
CMakeLists.txt
Edit the CMakeLists.txt.
Uncomment and modify the Declare a C++ executable section to contain the following:
# Declare a C++ executable
add_executable(missing_depth_overlay_view src/missing_depth_overlay_view.cpp)

# Add cmake target dependencies of the executable
# same as for the library above
add_dependencies(missing_depth_overlay_view ${${PROJECT_NAME}_EXPORTED_TARGETS} ${catkin_EXPORTED_TARGETS})

# Specify libraries to link a library or executable target against
target_link_libraries(missing_depth_overlay_view
  ${catkin_LIBRARIES}
)
Code
Create the new file:
src/missing_depth_overlay_view.cpp
#include <cv_bridge/cv_bridge.h>
#include <image_transport/image_transport.h>
#include <image_transport/subscriber_filter.h>
#include <message_filters/time_synchronizer.h>
#include <ros/ros.h>
#include <opencv2/highgui/highgui.hpp>

namespace
{

/// Highlight missing depth pixels in the RGB image.
void maskMissingDepth(const cv::Mat &rect_color, const cv::Mat1f &depth, cv::Vec3b highlight_color,
                      double highlight_alpha, cv::Mat &out)
{
    out.create(rect_color.size(), rect_color.type());

    // depth images are smaller than color images
    const float ratio = static_cast<float>(rect_color.cols) / depth.cols;
    for (int r = 0; r < rect_color.rows; ++r)
    {
        for (int c = 0; c < rect_color.cols; ++c)
        {
            cv::Vec3b color = rect_color.at<cv::Vec3b>(r, c);

            // Blend color for bad depths (cf REP 117 & 118)
            float d = depth(r / ratio, c / ratio);
            if (!std::isfinite(d))
            {
                color = highlight_color * highlight_alpha + color * (1.0 - highlight_alpha);
            }

            out.at<cv::Vec3b>(r, c) = color;
        }
    }
}

void showMissingDepthOverlay(const sensor_msgs::ImageConstPtr &rect_color, const sensor_msgs::ImageConstPtr &depth)
{
    cv_bridge::CvImageConstPtr cv_rect_color_ptr = cv_bridge::toCvShare(rect_color);
    cv_bridge::CvImageConstPtr cv_depth_ptr = cv_bridge::toCvShare(depth);

    // pick up a distinguishable color, unlikely to appear in natural environment
    cv::Vec3b hi_color(230, 0, 230);

    cv::Mat masked;
    maskMissingDepth(cv_rect_color_ptr->image, cv_depth_ptr->image, hi_color, /*highlight_alpha=*/0.5, masked);
    cv::cvtColor(masked, masked, CV_BGR2RGB);
    cv::imshow("Missing depth overlay", masked);

    char ch = cv::waitKey(30);
    if (ch == 27 || ch == 'q')
    {
        ros::shutdown();
    }
}

}  // unnamed namespace

int main(int argc, char *argv[])
{
    // initialize the ROS node
    ros::init(argc, argv, "missing_depth_overlay_view");
    ros::NodeHandle n;

    // subscribe to the 2 image topics
    image_transport::ImageTransport it(n);
    image_transport::SubscriberFilter depth_sub(it, "/depth_map/image", 3);
    image_transport::SubscriberFilter rect_color_sub(it, "/left_rgb_rect/image_rect_color", 10);

    // synchronize the 2 topics
    message_filters::TimeSynchronizer<sensor_msgs::Image, sensor_msgs::Image> sync(rect_color_sub, depth_sub, 10);
    sync.registerCallback(boost::bind(&showMissingDepthOverlay, _1, _2));

    std::cout << "To quit, hit ^C in the console and 'q' or 'escape' in one the window.\n";

    // ROS main loop, ^C to quit
    ros::spin();
    return 0;
}
The code explained
The main() function
- Initialize the node.
  ros::init(argc, argv, "missing_depth_overlay_view");
  ros::NodeHandle n;
The ROS wiki explains this in detail: Writing a Simple Publisher and Subscriber (C++).
- Subscribe to the 2 image topics:
  image_transport::ImageTransport it(n);
  image_transport::SubscriberFilter depth_sub(it, "/depth_map/image", 3);
  image_transport::SubscriberFilter rect_color_sub(it, "/left_rgb_rect/image_rect_color", 10);
- /depth_map/image
- The topic to receive the rectified depthmaps of the left camera (there is no depthmap for the other camera).
- /left_rgb_rect/image_rect_color
- The topic of the left camera,
with the fisheye images rectified.
There is a variant of this topic providing a monochrome image, which can be useful for computer vision algorithms.
Using image_transport opens the possibility to stream compressed images,
thus reducing network bandwith.
To do so, one can specify the TransportHints argument
of the image_transport::SubscriberFilter constructor.
- Register a synchronized callback for the two topics.
  message_filters::TimeSynchronizer<sensor_msgs::Image, sensor_msgs::Image> sync(rect_color_sub, depth_sub, 10);
  sync.registerCallback(boost::bind(&showMissingDepthOverlay, _1, _2));
- The maximum rate of the depth images will usually be lower than the grayscale or rgb image rates. This means depth images will only be available for some of the rectified images.
- The depth images are computed from the rectified images, thus they have the exact same timestamp. That’s the reason we use an exact time synchronizer and not an approximate variant (http://wiki.ros.org/message_filters/ApproximateTime).
When a pair of images, depth and rectified, with the same timestamp is received,
the callback showMissingDepthOverlay() is fired.
See also ros.wiki.org: message_filters: Time Synchronizer.
- Run the main loop.
ros::spin();
The ROS wiki explains this in detail: Writing a Simple Publisher and Subscriber (C++).
The showMissingDepthOverlay() callback
This callback is the glue between the the ROS messages
and the ROS-agnostic algorithm maskMissingDepth().
- Convert ROS images to OpenCV images.
  cv_bridge::CvImageConstPtr cv_rect_color_ptr = cv_bridge::toCvShare(rect_color);
  cv_bridge::CvImageConstPtr cv_depth_ptr = cv_bridge::toCvShare(depth);
See http://wiki.ros.org/cv_bridge.
- Call the OpenCV algorithm.
  cv::Vec3b hi_color(230, 0, 230);
  cv::Mat masked;
  maskMissingDepth(cv_rect_color_ptr->image, cv_depth_ptr->image, hi_color, /*highlight_alpha=*/0.5, masked);
- Display the result with OpenCV.
  cv::cvtColor(masked, masked, CV_BGR2RGB);
  cv::imshow("Missing depth overlay", masked);

  char ch = cv::waitKey(30);
  if (ch == 27 || ch == 'q')
  {
      ros::shutdown();
  }
The maskMissingDepth() algorithm
This is the ROS-agnostic algorithm. This function adds an overlay to the rectified image. This overlay highlights the parts of the image where depth information is not available (e.g. due to lack of textures on a surface).
- Allocate the output image.
out.create(rect_color.size(), rect_color.type());
- Compute ratio rectified color image over depth image.
const float ratio = static_cast<float>(rect_color.cols) / depth.cols;
Depth images do not use the same scale as the rectified color images. For example, the rectified color images can be 576x576 whereas the depth images can be 96x96 (c.f. Stereo settings).
- Iterate over the input image and compute the output.
  for (int r = 0; r < rect_color.rows; ++r)
  {
      for (int c = 0; c < rect_color.cols; ++c)
      {
          cv::Vec3b color = rect_color.at<cv::Vec3b>(r, c);

          // Blend color for bad depths (cf REP 117 & 118)
          float d = depth(r / ratio, c / ratio);
          if (!std::isfinite(d))
          {
              color = highlight_color * highlight_alpha + color * (1.0 - highlight_alpha);
          }

          out.at<cv::Vec3b>(r, c) = color;
      }
  }
Depth Images are described in REP 118:
REP 117, which Parrot S.L.A.M.dunk satisfies, states that invalid depth values are +/-Inf or quiet NaN.
std::isfinite is used to verify that depth values are valid (i.e: quiet_NaN()).
Build
To build the node, go in the tutorial’s workspace,
install the dependencies and and invoke catkin_make:
cd ~/slamdunk_tutorial_ws
sudo rosdep init
rosdep update
rosdep install --from-paths src --ignore-src -y
catkin_make
Test the node
If the node has not been written on the Parrot S.L.A.M.dunk itself, you need to export some environment variable to tell the node how to access the S.L.A.M.dunk node.
export ROS_HOSTNAME=$(hostname).local
export ROS_MASTER_URI="http://192.168.45.1:11311"
You can now run the node with rosrun:
rosrun slamdunk_tutorial missing_depth_overlay_view
Sample result:
What did we learn?
- How to create a simple node.
- How to subscribe to Parrot S.L.A.M.dunk topics.
- How to synchronize multiple topics with message filters.
- How to convert ROS messages to OpenCV and use OpenCV algorithms on them.
- How to process Parrot S.L.A.M.dunk’s depth images.
Go deeper
- Use image_transport_plugins to subscribe to compressed topics.
- Convert the node into a reusable nodelet.
- Use and combine other Parrot S.L.A.M.dunk topics: pose, IMU, magnometer, keyframes’ depth images, …
The S.L.A.M.dunk node
The Parrot S.L.A.M.dunk comes with this ROS node preinstalled. This makes it possible to run rviz and other ROS tools out of the box.
This how-to describes the process of building and running your own SLAM.d.u.n.k. node.
Why rebuild the node?
Rebuilding the node can be useful for a few reasons:
You need it for performance reasons. In the node’s process you can reduce copies, serializations and deserializations.
There is a bug, or a missing feature that can only be accessed from the node. In this case it’s recommended to open an issue on Github, so everyone can benefit from it:
That said, if you don’t need it, don’t do it.
What we recommend is to subscribe to the node’s topics in a new node and integrate your algorithm(s) in this node (or nodelet). The code of the node is not guaranteed to be stable whereas the topics it exports have stronger stability guarantees.
Build the slamdunk_ros packages
Please note that building and running S.L.A.M.dunk node happens on the Parrot S.L.A.M.dunk itself.
This is necessary because the node uses an unofficial SDK1.
Instructions to build the slamdunk_ros packages
are available in a dedicated section:
Stop and disable the system node
A slamdunk_node is running by default on the product.
This node will conflict with the custom built node for 2 reasons:
- the sensors API that the node uses can only be opened once, a second open will fail with an error similar to “Device or resource busy”.
- the topics exposed by the node will clash with the one of the system node.
To disable the node, type:
sudo stop slamdunk_ros_node
More details on how to disable permanently and to restart it is available in the slamdunk_node section.
Run the node
The node needs to be run as root, this is required by the sensors API used by the node.
To start a shell session as root, type:
sudo su
Activate the environement:
# source devel/setup.bash
Export the node’s name so that other nodes can contact it2:
# export ROS_HOSTNAME=$(hostname).local
To run the node, type:
# roslaunch slamdunk_node slamdunk.launch
Test the node
Open another shell as a simple user on Parrot S.L.A.M.dunk.
Setup the environment:
source /opt/ros/indigo/setup.bash
To test the node, type:
rostopic echo -n 3 /pose
This command output (values can vary):
header:
  seq: 0
  stamp:
    secs: 1478180691
    nsecs: 224341794
  frame_id: map
pose:
  position:
    x: 0.0
    y: 0.0
    z: 0.0
  orientation:
    x: -0.000348195433617
    y: -3.23653111991e-05
    z: 0.000101313009509
    w: 0.999999940395
---
...
Cleanup
To stop the slamdunk.launch node, hit ^C.
To restart the system node:
sudo start slamdunk_ros_node
For more information, refer to the section slamdunk_node.
Final words
Now that the workspace is configured, to work again on the project, the steps to remember are the following:
First, you need to activate the environment once:
source devel/setup.bash
Then you can proceed to the edit, compile and test cycle. The command to compile is:
catkin_make -j2
Footnotes
1 This SDK cannot be considered stable and API may change in the future, the ROS SDK on the other hand will try to maintain backward compability. ↩
2 More information in the Network Setup section. ↩
Desktop mode
It’s possible to work on Parrot S.L.A.M.dunk directly, as if it were a personal computer. To do so, connect an HDMI monitor, a mouse, a keyboard, most likely with the help of a USB hub.
You may also need network access, for example to install packages, refer to Network setup: USB to Ethernet adapter.
A few scripts are provided to install a desktop and a few ROS tools. These scripts are provided as a convenience, they are not required to work on the Parrot S.L.A.M.dunk itself.
To installs a desktop enviromnent:
sudo ~/scripts/install_desktop.sh
sudo start lightdm
To install a few ROS tools, such as rviz:
sudo scripts/install_ros_tools.sh
To run rviz,
source the Parrot S.L.A.M.dunk environment
(c.f. ROS integration: Configure ROS environment)
and launch rviz:
source /opt/ros-slamdunk/setup.bash
rviz -d $(rospack find slamdunk_visualization)/rviz/slamdunk.rviz
ROS integration
Configure ROS environment
When working on the Parrot S.L.A.M.dunk, there are two ROS setup scripts available.
The first one, brings the standard ROS packages:
source /opt/ros/indigo/setup.bash
The second one, specific to the Parrot S.L.A.M.dunk, brings both the standard ROS environment and the S.L.A.M.dunk node environment.
source /opt/ros-slamdunk/setup.bash
With this environment, you can access the Parrot S.L.A.M.dunk messages.
Comparison of the output of a rostopic echo on a custom message:
$ source /opt/ros/indigo/setup.bash
$ rostopic echo -n 1 /quality
ERROR: Cannot load message class for [slamdunk_msgs/QualityStamped]. Are your messages built?
$ source /opt/ros-slamdunk/setup.bash
$ rostopic echo -n 1 /quality
header:
  seq: 20062
  stamp:
    secs: 1483438873
    nsecs: 751636537
  frame_id: map
quality:
  value: 0
---
$
Conventions for units and coordinate systems
When working with the Parrot S.L.A.M.dunk topics, you may be wondering what are the units are, what the frames of reference are, etc.
We strive to be compliant to the ROS REPs:
This means the depth images follows the REP 117 & REP 118, the SLAM pose, follows REP 105, etc.
roscore
The Parrot S.L.A.M.dunk runs a roscore (wiki.ros.org/roscore) by default, this is offered as a convenience.
Howewer, in a distributed setup, when multiple robots are involved, the role of the master node may be entrusted to another machine. Thus, the roscore running on the Parrot S.L.A.M.dunk needs to be shut down.
The roscore runs as a system service, using Ubuntu 14.04 init system:
upstart.
The service configuration file is located at: /etc/init/roscore.conf.
To stop the roscore temporarily (until next reboot), type:
sudo stop roscore
To start it, type:
sudo start roscore
To disable the roscore permanently (across reboots)1, use:
echo manual | sudo tee /etc/init/roscore.override
If you want the roscore back, just delete the override file and start the service:
sudo rm /etc/init/roscore.override
sudo start roscore
slamdunk_node
The slamdunk_node2,
is also running by default on the product.
The service configuration file is located at: /etc/init/slamdunk_ros_node.conf.
To stop the node temporarily (until next reboot), type:
sudo stop slamdunk_ros_node
To start it, type:
sudo start slamdunk_ros_node
To disable the node permanently (across reboots)1, use:
echo manual | sudo tee /etc/init/slamdunk_ros_node.override
If you want the node back, just delete the override file and start the service:
sudo rm /etc/init/slamdunk_ros_node.override
sudo start slamdunk_ros_node
Footnotes
1 More information on disabling a job can be found here: http://upstart.ubuntu.com/cookbook/#disabling-a-job-from-automatically-starting ↩
2 This node is available on Github (https://github.com/Parrot-Developers/slamdunk_ros) and is described in the S.L.A.M.dunk node section. ↩
Dynamic reconfiguration
Some of the Parrot S.L.A.M.dunk node parameters can be reconfigured dynamically. For example the RTP H.264 streaming service can be enabled and configured with dynamic reconfigure.
The dynamic_reconfigure ROS tools are used to modify these parameters. To install them, type:
sudo apt-get install ros-indigo-dynamic-reconfigure ros-indigo-rqt-reconfigure
Change camera resolution and framerate
From the command line, with dynparam
To set the camera resolution and framerate to 1500x1500 at 60 FPS from the CLI,
use dynparam:
rosrun dynamic_reconfigure dynparam set /slamdunk_node video_mode 1500_1500_60
From a GUI, with rqt_reconfigure
Launch rqt_reconfigure:
rosrun rqt_reconfigure rqt_reconfigure slamdunk_node
To change the camera resolution and FPS of the Parrot S.L.A.M.dunk, use the video_mode drop-down list, and select the mode of your choice.
For example, to select a camera resolution of 1500x1500, and a framerate of 60 FPS do:
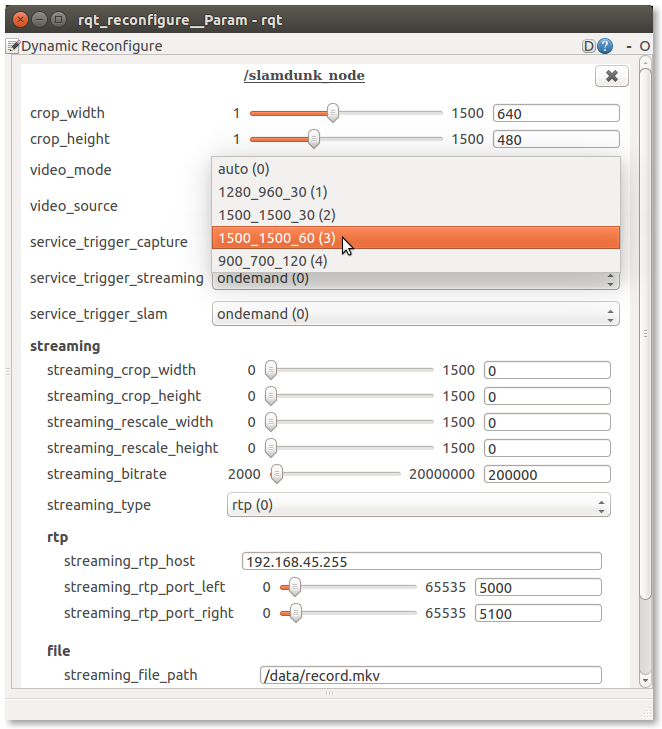
RTP H.264 streaming
In addition to the traditional sensor_msgs/Image message to transmit camera frames, the Parrot S.L.A.M.dunk offers 2 RTP H.264 streams, one for each camera. Internally, this is implemented by a Gstreamer pipeline.
On the client side, e.g. for rviz integration, it’s possible to use a gscam fork to get the frames as ROS messages.
It is also possible to directly access the video with a media player such as mplayer or vlc.
Start streaming service, using dynamic_reconfigure (c.f. Dynamic reconfiguration):
rosrun dynamic_reconfigure dynparam set /slamdunk_node service_trigger_streaming always
Create SDP file for both cameras:
cat <<'EOF' > cam0.sdp
v=0
m=video 5000 RTP/AVP 96
c=IN IP4 192.168.45.1
a=rtpmap:96 H264/90000
EOF
cat <<'EOF' > cam1.sdp
v=0
m=video 5100 RTP/AVP 96
c=IN IP4 192.168.45.1
a=rtpmap:96 H264/90000
EOF
Visualize left camera with mplayer:
mplayer cam0.sdp
Visualize right camera with vlc:
vlc --network-caching=250 cam1.sdp
Finally, to reset the streaming service to its default state:
rosrun dynamic_reconfigure dynparam set /slamdunk_node service_trigger_streaming ondemand
Stereo
Stereo calibration
/factory/intrinsics.yml and /factory/extrinsics.yml contain the camera parameters
using a format very similar to OpenCV3’s fisheye model.
The main difference being in the way the optical center is stored. OpenCV commonly measures the optical center from the top-left pixel, we choose to measure it from the center of the image sensor. Thus, a camera perfectly aligned with the sensor’s center would have an optical center of (0,0)
In intrinsics.yml:
M1 and M2: respectively left and right camera matrices.
- M(0, 2) and M(1, 2): optical center, expressed in pixel units from the image center
- M(0, 0) and M(1, 1): focal lengths fx, fy.
D1 and D2: left and right camera distortion parameters.
reminder: apart from the optical center, these parameters are compatible with the fisheye model of OpenCV3.
In extrinsic.yml:
- R1 and R2: rectification transform (rotation matrix) for the left and right cameras respectively.
- T: translation vector between the coordinate systems of the cameras.
- R: rotation matrix between the left and right camera coordinate systems.
Stereo settings
You can tweek the stereo matching settings in the /etc/kalamos/stereo.yml file.
You’ll find a description of most parameters within the stereo.yml file,
but it would be easier to understand what the 3 configurable resolutions refer to with illustrations.
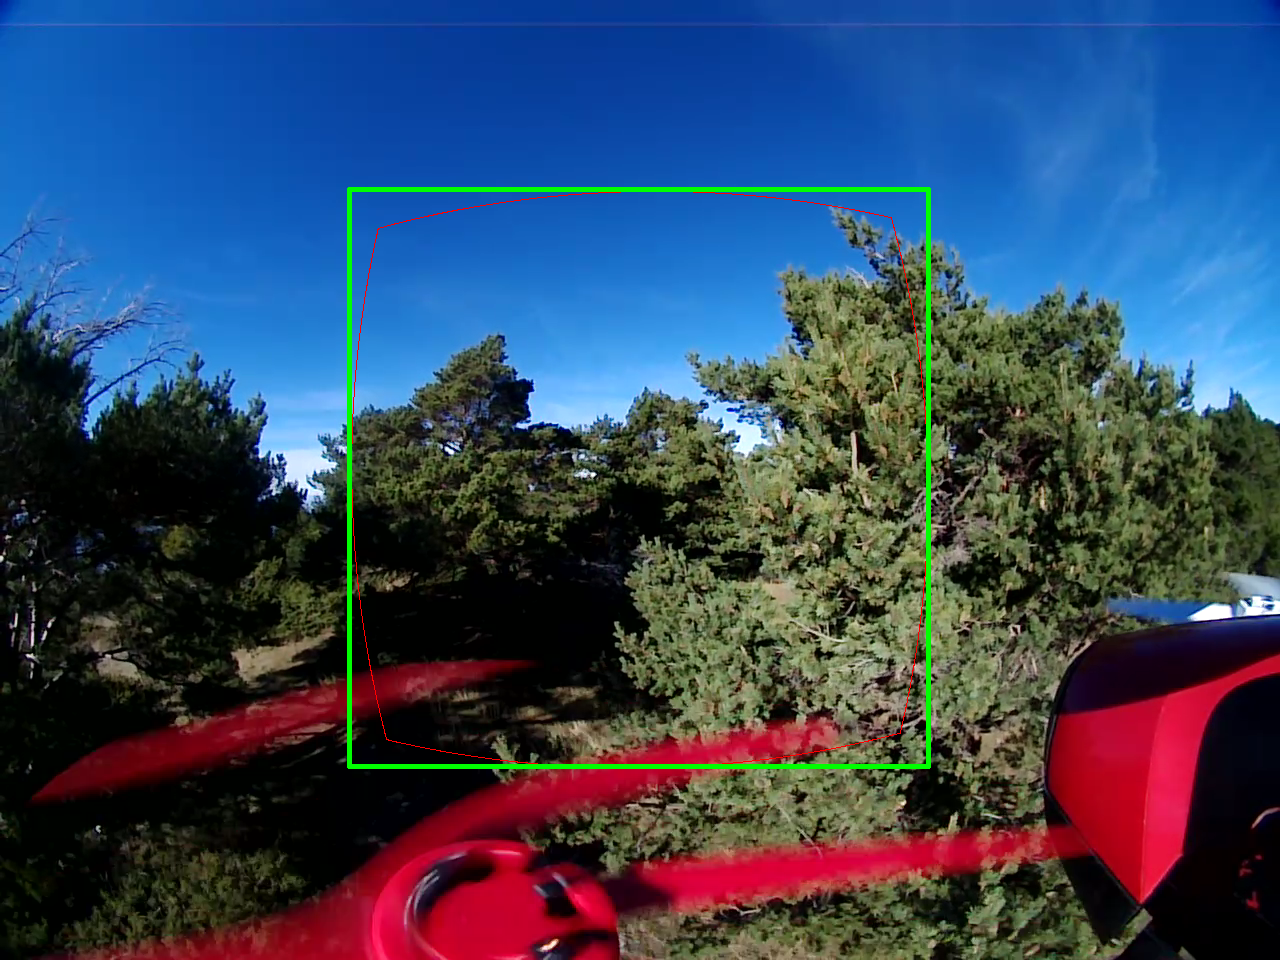
The image below is an rgb image from the left camera. The green rectangle, of size cropCols/cropRows (here 576/576), delimits the ROI for depth calculation. The red lines delimit the pixels that will be rectified. Please note how the red area is inscribed in the green rectangle.
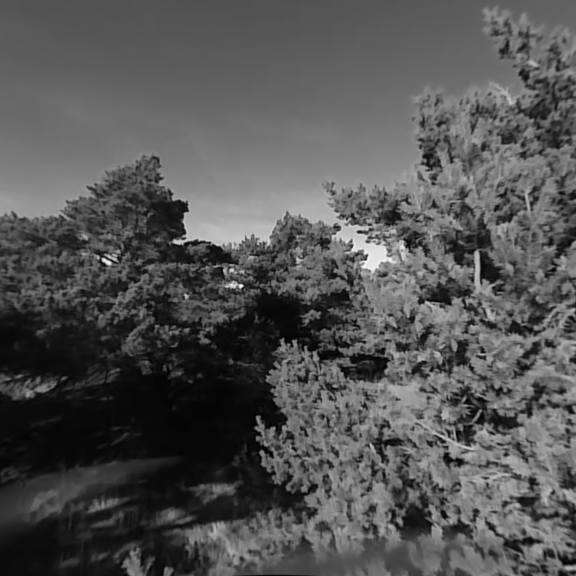
The image below is the left rectified image and is of size rectCols/rectRows (here 576/576). Please note that rectSize and cropSize do NOT have to be the same, but it usually makes sense for them to be.
Finally, the image below is the resulting depth image and is of size depthCols/depthRows (here 288/288). Please note that rectSize has to be a multiple of depthSize (here, x2).

Network setup
In this section we describe the network setup of the Parrot S.L.A.M.dunk.
ROS being a distributed system, it is useful to know how the different machines can communicate together.
Regarding this subject, the ROS Network Setup wiki page is a good read:
USB Ethernet Gadget/RNDIS
A DHCP server is listening to connection on the Micro-USB 2.0 OTG port. When a device connects to the port, the Parrot S.L.A.M.dunk will offer an IP adress to the device.
- the Parrot S.L.A.M.dunk address is 192.168.45.1
- the addresses offered are of the form 192.168.45.XX
After connecting the Parrot S.L.A.M.dunk to a computer, to test the connection, type:
ping -c 1 192.168.45.1
To get your address:
$ hostname -I | grep -o '192\.168\.45\...'
192.168.45.48
Wi-Fi USB dongle
Parrot S.L.A.M.dunk can also serve as a wireless access point when a Wi-Fi USB dongle is plugged in.
- SSID: SLAMDunk-XXXXXX
Where XXXXXX is the relevant part of the equivalent
Parrot S.L.A.M.dunk hostname:
    $ hostname
    slamdunk-XXXXXX
- the Parrot S.L.A.M.dunk address is 192.168.44.1
- the addresses offered are of the form 192.168.44.XX
After connecting to the Parrot S.L.A.M.dunk via Wi-Fi, to test the connection, type:
ping -c 1 192.168.44.1
To get your address:
$ hostname -I | grep -o '192\.168\.44\...'
192.168.44.27
USB to Ethernet adapter
When an USB to Ethernet adapter is plugged to the USB 3 host port, the Parrot S.L.A.M.dunk will emit a DHCP request. It’s not a DHCP server, this time it’s a client.
This is useful to install packages from the internet. Just plug an USB to Ethernet adapter, plug the Parrot S.L.A.M.dunk to your network and install packages.
To verify the network access, type:
ping -c 1 google.com
Bonjour/Zeroconf
The Parrot S.L.A.M.dunk also offers Bonjour/Zeroconf symbolic names.
First there is the $(hostname).local name (e.g: slamdunk-000042.local).
This one is useful to communicate with the Parrot S.L.A.M.dunk
regardless of the interface used.
For example,
the Parrot S.L.A.M.dunk roscore node is launched with the ROS_HOSTNAME
variable set to this value.
export ROS_HOSTNAME=$(hostname).local
And in a multi Parrot S.L.A.M.dunk setup,
where one of the device is the master,
it would make sense to specify the ROS_MASTER_URI to this value:
$ export ROS_MASTER_URI=http://kalamos-000042.local:11311
Then there is one symbolic name for the USB host interface and one for the wireless access point interface.
- USB:
slamdunk-usb.local(192.168.45.1) - WLAN:
slamdunk-wifi.local(192.168.44.1)
How to use the buttons
The Parrot S.L.A.M.dunk has two buttons.
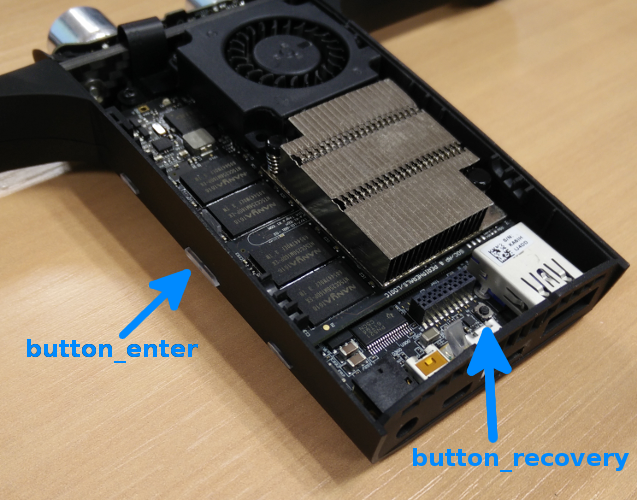
These buttons can be accessed from the sysfs:
/sys/devices/platform/user-gpio/button_enter//sys/devices/platform/user-gpio/button_recovery/
To read the value of the button at a specific point in time,
read the value file.
When the button is pressed, the value is 1,
when it is released the value is 0, e.g:
$ cat /sys/devices/platform/user-gpio/button_enter/value
0
Below is a simple program,
which reads button_enter and execute a command when the button is pressed:
button_enter.py
#!/usr/bin/env python3

import select, subprocess, sys

if len(sys.argv) == 1:
    print("usage: {} command".format(sys.argv[0]), file=sys.stderr)
    sys.exit(1)

f = open('/sys/devices/platform/user-gpio/button_enter/value', 'r')
poller = select.epoll()
poller.register(f, select.EPOLLPRI)

while True:
    events = poller.poll()
    f.seek(0)
    if f.read().rstrip() == '1':
        subprocess.call(sys.argv[1:])
Make the script executable:
chmod +x ./button_enter.py
Usage:
$ ./button_enter.py echo "Hello world!"
Hello world!
Hello world!
Hello world!
...
How to use the LEDs
The Parrot S.L.A.M.dunk has 4 RGB LEDs.
The LEDs can be controlled from the the sysfs, more specifically they are compatible with gpio-leds.
Each color can be set independently, the available sysfs entries are:
/sys/class/leds/front:left:blue/sys/class/leds/front:left:green/sys/class/leds/front:left:red/sys/class/leds/front:right:blue/sys/class/leds/front:right:green/sys/class/leds/front:right:red/sys/class/leds/rear:left:blue/sys/class/leds/rear:left:green/sys/class/leds/rear:left:red/sys/class/leds/rear:right:blue/sys/class/leds/rear:right:green/sys/class/leds/rear:right:red
To enable a color, write the value 1 to the brightness file, e.g:
echo 1 > /sys/class/leds/rear:right:red/brightness
To reset the color, write 0:
echo 0 > /sys/class/leds/rear:right:red/brightness
Multiple colors can be combined:
# red
echo 1 > /sys/class/leds/front:left:red/brightness
# yellow
echo 1 > /sys/class/leds/front:left:green/brightness
# white
echo 1 > /sys/class/leds/front:left:blue/brightness
To blink, write timer to the trigger file, e.g:
echo 1 > /sys/class/leds/rear:left:red/brightness
echo timer > /sys/class/leds/rear:left:red/trigger
To reset blinking, write none to the trigger file:
echo none > /sys/class/leds/rear:left:red/trigger
Working with Bebop 2
The Parrot S.L.A.M.dunk and the Bebop 2 can be connected together with the included micro USB A to micro USB B cable to extend their capabilities.
To carry and power the Parrot S.L.A.M.dunk on Bebop 2 you can refer to this tutorial on the Parrot developer forum.
Use Bebop 2 Wi-Fi
It is possible to use the Bebop 2 Wifi to access Parrot S.L.A.M.dunk. Here is an example on an Ubuntu 14.04 workstation.
Connect Parrot S.L.A.M.dunk to Bebop 2 with the micro USB A to micro USB B cable. Start both Parrot S.L.A.M.dunk and Bebop 2 regardless of the order. Connect to Bebop 2 Wi-Fi on your workstation.
Add a new route on your computer:
sudo route add -net 192.168.43.0 netmask 255.255.255.0 gw 192.168.42.1
Connect to S.L.A.M.dunk:
ssh slamdunk@192.168.43.2
Bebop 2 Ethernet over USB
Non persistent way
Connect the Parrot S.L.A.M.dunk to the Bebop 2 with the micro USB A to micro USB B cable.
On the Bebop 2 press four times on the power button to activate Ethernet over USB.
To test the success of this operation, connect to Parrot S.L.A.M.dunk with the method of your choice; then try to connect to the Bebop 2 with telnet:
telnet 192.168.43.1
If you see the welcome message of the Bebop indicating: BusyBox,
the connection succeeded and you are connected to the Bebop 2.
To quit, type exit.
Persistent way
Press four times on the Bebop 2 power button. From your workstation, connect to the Bebop 2 by Wi-Fi (IP address is 192.168.42.1) or USB with a micro USB B cable (IP is 192.168.43.1):
telnet 192.168.<42,43>.1
If you see the welcome message of the Bebop indicating: BusyBox,
the connection succeeded and you are connected to the Bebop 2.
Now we will modify the startup Bebop 2 script to launch USB over Ethernet at every start:
dev
sed -i 's/exit 0/\/bin\/usbnetwork.sh\n\nexit 0/' /etc/init.d/rcS
Now reboot the drone and try to connect to it through USB without pressing the Bebop 2 button 4 times.
Control Bebop 2
You can use the Parrot S.L.A.M.dunk to control Bebop 2. Here are several ways to achieve it:
- Use the built-in bebop node (see below).
- You can make your own implementation of the ARSDK3 by implementing the Linux version directly on your Parrot S.L.A.M.dunk.
- Use a third party ROS node such as bebop_autonomy, it implements most of the latest ARSDK3 features in a ROS node.
Built-in bebop node
The Parrot S.L.A.M.dunk comes with a ROS node pre-installed to control the Bebop 2.
On the Parrot S.L.AM.dunk, start the node by starting its associated service:
start bebop_ros_node
or start directly the bebop_node of the slamdunk_bebop_robot package:
source /opt/ros-slamdunk/setup.bash
rosrun slamdunk_bebop_robot bebop_node
List the topics of the bebop_node:
source /opt/ros-slamdunk/setup.bash
rostopic list | grep bebop
Gamepad to control Bebop 2
It’s possible to use a gamepad on your computer to control Bebop 2 with S.L.A.M.dunk.
All the gamepad or joystick working on Ubuntu can be used to control the Bebop 2 but you will have to write a simple configuration file for it. See the joy ROS package for more information.
Supported controllers are:
- Logitech F310 gamepad
First build the slamdunk_ros packages on your workstation.
Plug the controller to your workstation.
Identify the device file for your controller with jstest-gtk:
sudo apt-get update
sudo apt-get install jstest-gtk
jstest-gtk
Navigate through the different inputs and find the file associated to your controller.
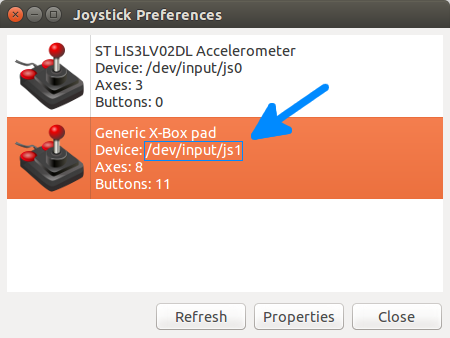
Report this information /dev/input/js<X> in the file
slamdunk_bebop_joystick/launch/joystick.launch
at the line <param name="dev" value="/dev/input/js0" />
Rebuild the node:
catkin_make -j2
Connect to Parrot S.L.A.M.dunk through Bebop 2 Wi-Fi and launch the bebop_node.
Source your environment:
source devel/setup.bash
Export ROS_MASTER_URI and ROS_HOSTNAME:
export ROS_MASTER_URI=http://192.168.43.2:11311
export ROS_HOSTNAME=$(hostname).local
Use roslaunch to start the node:
roslaunch slamdunk_bebop_joystick joystick.launch
For the Logitech F310 gamepad here is the mapping of the buttons and sticks:
- Y button: take-off
- B button: land
- Logitech button: emergency
- RB button + right stick: roll and pitch
- RB button + left stick: altitude and yaw
Troubleshooting
For developement questions, where Parrot S.L.A.M.dunk software engineers and users can answer, use the developer forum:
For other inquiries, such as hardware related issues, please favor the support website:

